How to Prepare for Roof Installation
A roof is one of the most important parts of your home. It protects you and your family from the elements and can add to your curb appeal.
A roof comprises rafters or pre-fabricated trusses on top of sheathing (usually plywood). It’s also important to waterproof the valleys and areas where a roof meets walls, chimneys, and plumbing vents. To learn more, visit https://www.bostonroofingco.com/.
Your home’s roof is a work zone that should be treated like a construction site. That means it’s important to prepare for the arrival of roofing contractors before they start working on your new roof. This can help the process go more smoothly and protect your family, possessions, and landscaping from dirt, debris, and dust.
Taking the time to clean out the attic and move any valuables that are stored there is a good idea. It’s also helpful to clear off the walkways leading to the house. Even conscientious roofers are likely to kick up dust and other particles. You may want to cover the items in your attic with plastic sheets or drop cloths to protect them from the mess.
If you have children, consider having them stay at Grandma’s during the roof replacement. The noise produced by the scraping, nail-pounding, and other roof processes can be a lot for them to handle. Plus, metal flashing can cut just like a razor, and nails and felt caps are common hazards for kids to find in the yard.
Before the roofing contractors begin work, they should remove any roof accessories, such as satellite and TV dishes. This can be done from inside your attic, or they can use extension cords to access outlets on the exterior of your home. You should also call your cable or satellite provider to ask them to schedule your service during this time.
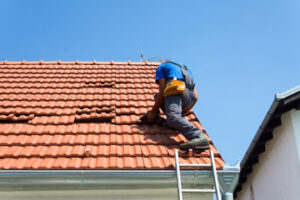
Once the roof underlayment is installed, the next row of shingles can be placed. The first side of the shingle row should be fastened to the underlayment, and the other side should overlap the first row by about 6 inches. Lastly, the drip edge should be placed along each gable end of the roof.
If any trees are close to the roof, it is a good idea to have them pruned before the project starts. They can damage shingles with their branches, and falling leaves and other debris promote shingle-deteriorating algae. Plus, tree limbs can fall onto the roof during storms, making it unsafe for workers to be on the roof.
Materials
Roofing materials are an important consideration when it comes to upgrading your home. They can communicate your style, add value and complement other home features. They also vary in cost, life span and warranty.
To install the roof, your contractor will need a variety of supplies. These include roofing tools and supplies, underlayment, shingles, metal sheathing and fasteners. You’ll also need tarps to protect the landscaping and other materials.
Underlayment is a waterproof material that your contractor will use to cover the roof deck before laying shingles. It’s a crucial step in the roofing process because it creates a barrier to keep water away from the wood rafters and wooden trusses underneath. The contractor will attach the underlayment to the rafters and wooden trusses with a nailing pattern that starts close to the edge and gradually spreads out.
Once the underlayment is in place, the roofers will install the first row of shingles. These shingles, called the starter course, will protect the roof from water and wind-driven debris as the installers put on the rest of the shingles. The first row of shingles will overlap the next by about six inches. The contractors will repeat this overlapping and nailing pattern until the roof’s ridge.
The last layer of the roof will be a membrane that’s made from either organic or synthetic materials. These layers help protect the roof from moisture and reduce energy costs. The membranes are very durable and can withstand punctures, tears, chemical spills, oil, standing water, bacterial growth and heat. The best part about these membranes is that they have a manufacturer warranty of two to 25 years.
Roof flashing is galvanized steel or lead that professional roofers use to direct water away from specific areas of the roof, like vents, chimneys, skylights and window dormers. The flashing helps keep water from entering the home and can prevent moisture damage in the attic. If the roof is very steep, you’ll need to install brackets or toe boards to give yourself some footing. Lastly, you’ll need a ladder to reach the roof.
Safety
The roof is a dangerous place, and it’s easy to slip and fall while working on it. However, being proactive about safety ensures that roofing projects are completed both efficiently and safely. Taking a few simple steps can make all the difference.
During the roofing process, there will be lots of dust and debris that may fly around. It is important to protect your plants, shrubs and lawn with tarps before the project begins. Additionally, if you have furniture on your patio or in your backyard, move it to a safe location or cover it with tarps. This will prevent any accidental scratches or damage from falling debris and shingles.
If you have children or pets, make arrangements for them to stay elsewhere during the re-roofing process. The noise of hammers and tools can make pets and children anxious, so this is best for their health. If possible, have them stay at a friend’s house or take them to a pet boarding service for the duration of the work.
It’s also important to make sure that everyone involved in the roof installation is wearing proper clothing and footwear. Slips are the most common cause of rooftop accidents, and they can be prevented with a pair of high-quality shoes that have good traction. Additionally, make sure that workers are not drinking too much water at one time as this can lead to dehydration and dizziness.
Aside from the proper clothing and footwear, it’s also important to keep the work area clean and free of debris. Even the smallest items can trip workers and cause injuries, so it’s important to inspect the work space regularly.
Lastly, if you have a ladder on the roof, make sure it is stable and positioned correctly. Some roofers like to weight the base of the ladder with sand bags to ensure that it does not tip over. Finally, make certain that the ladder is properly secured by attaching it to a secure point on the roof and by locking the rungs. If you do not have a sturdy ladder, consider renting one from a home improvement store or a professional roofing company.
Installation
The roof is an integral part of a building, serving to protect it from rain, snow, sunlight, and extremes of temperature. It has been constructed in a wide variety of forms over the years, from a flat to a pitched or vaulted structure. Roofing materials such as shingles, tiles, and metal can be used to create a protective covering for the structure, which can enhance its aesthetic and function.
Whether installing an entirely new roof or replacing an existing one, the process of roof installation requires a thorough assessment and detailed planning to ensure a quality, lasting result. A professional roofing contractor has the skills, knowledge, and equipment to handle this delicate work safely and effectively.
The first step in the roof installation process is obtaining all necessary permits. This includes a permit for the type of roofing material and color, if required by your local building code. It is also important to check with any homeowner association or architectural review board, as they may have special requirements for your community.
Once the contractor has all of the permits in place, they will begin by setting up a job site. This may include moving items that could get damaged during the process, like outdoor furniture or grills. It is also a good idea to cover up any landscaping items with tarps, so they do not get wet during the tear-off and installation process.
Next, the roofer will remove any old shingles and metal sheets that are on the roof. They will also remove any vents or chimneys on the roof, if they are still in place. Once all the old items have been removed, the contractor will install an ice and water barrier and underlayment. They will start on the gable ends of the roof and move up, overlapping sections as they go. The underlayment is then fastened down with shingle nails, or tin snips for metal.
Once the underlayment and ice and water barrier have been installed, the roofer will install the drip edge on the gable end of the roof. They will then install flashing around all the roof’s joints, including at the valleys and chimneys. This will help prevent water leaks and will seal the joints in the roof to keep out moisture. They will also inspect the gutters for any obstructions, and they will clean up the work area once they are finished.